Search This Blog

Friday, October 29, 2010

Halloween Cookies!

Happy (almost) Halloween!

DSCN7195_labeled

I've been wanting to make these cookies ever since Annie posted them last year, and she even added some super cute new ones earlier this week. I especially love the spider webs, which use one of my favorite marbling techniques. I've got two sugar cookie posts ready to share with you soon that feature this technique!

DSCN7202_labeled

DSCN7204_labeled

DSCN7206_labeled

DSCN7210_labeled

DSCN7215_labeled

I've posted about Royal Icing, Sugar Cookies, and marbling before, so I'm just directing you to those recipes. The royal icing recipe is my favorite because it doesn't require a drying time between the outline step and flooding, which saves you time and prevents the undesirable outline look on your cookies. The sugar cookie recipe is the best I've found, and I've tested many! Bridget actually tested several recipes side-by-side and chose this one.

Hope everyone has a happy and safe weekend! :)

DSCN7217_labeled


Other sugar cookie posts for tips and techniques:

Tuesday, October 26, 2010

Shrimp Fra Diavolo with Linguine

DSCN7086_labeled

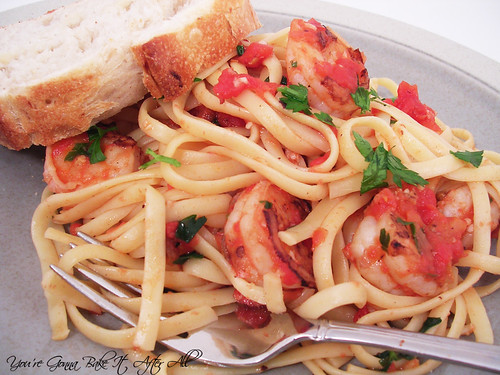
You are witnessing a first on this blog - seafood! You see, I typically stay away from all fish and seafood, but I've been slowly trying to incorporate a few new things into my diet, and shrimp has been one that I can handle if prepared correctly. For me, it's all about the cooking method - if the shrimp is boiled, forget about it. If it's been grilled or seared to get a nice char on the outside, I love it!

My dad loves shrimp, especially shrimp pastas, but my mom hates it and will only cook it for him once in a great while. She was out of town visiting my sister earlier this month, so I thought it would be a good opportunity for me to try my hand at cooking shrimp for the first time. Bob loves shrimp, so I knew I would be making my two men happy even if I didn't like it. I showed Bob 3 shrimp recipes from my America's Test Kitchen cookbook and let him pick; he chose this one.

I purchased "easy peel" shrimp which are deveined but still have the tails. As I was removing the tails from the raw shrimp and breathing in that 'shrimpy' air, I was convinced that I would be making myself a can of soup for dinner. When the shrimp had been cooked in the brandy and were resting on a plate, Bob came over and stole one, offering me a bite. I reluctantly accepted and was amazed to discover that it was delicious! No shrimpy taste, great texture, slightly sweet from the brandy. I then started to think I might actually eat this meal with them . . . and I did . . . and it was fantastic!

Although I had some trouble with the flambe-ing (it was one of my first times using my new range, which is electric and definitely and adjustment), the shrimp ended up perfectly cooked. I suggest, if you have trouble lighting the brandy on fire and it evaporates, just go with it. It's more important to cook the shrimp properly (i.e. not over-cook) than to get the brandy to light, in my opinion.

I highly recommend this recipe, and I hope you look forward to seeing more shrimp recipes here in the future! You'll notice I added a seafood label for this post . . . we'll see how often that gets used :)

Shrimp Fra Diavolo with Linguine

Ingredients:
1 pound medium-large shrimp (preferably 31 to 35 count), peeled and deveined
1 teaspoon crushed red pepper flakes (or more, to taste)
6 tablespoons extra-virgin olive oil
1 1/2 tablespoons table salt
1/4 cup Cognac or brandy
4 tablespoons minced garlic (about 12 medium or 8 large cloves)
1/2 teaspoon granulated sugar
1 28-ounce can diced tomatoes , drained
1 cup medium-dry white wine , such as Sauvignon Blanc
1/4 cup minced fresh parsley leaves
1 pound linguine or spaghetti

Directions:
1. Bring 4 quarts water to rolling boil, covered, in large Dutch oven or stockpot.

2. While water is heating, heat 12-inch heavy-bottomed skillet over high heat for 4 minutes. Meanwhile, toss shrimp, half of red pepper flakes, 2 tablespoons olive oil, and 3/4 teaspoon salt in medium bowl. Add shrimp to skillet and quickly spread in single layer; cook, without stirring, until bottoms of shrimp turn spotty brown, about 30 seconds.

3. Off heat, stir to turn shrimp, and add cognac/brandy; let stand off heat until cognac warms slightly, about 5 seconds, and return pan to high heat. Wave lit match over skillet until cognac ignites; shake skillet until flames subside, transfer shrimp to medium bowl, and set aside. *I had a lot of trouble with this part, mostly because I think my pan was too hot. Never got the brandy to light, but the shrimp were still delicious! If the brandy won't light, keep on eye on the shrimp and cook them as directed, no more.

4. Off heat, cool now-empty skillet 2 minutes; return to burner and reduce heat to low. Add 3 tablespoons olive oil and 3 tablespoons garlic; cook, stirring constantly, until garlic foams and is sticky and straw-colored, 7 to 10 minutes.

5. Add remaining red pepper flakes, 3/4 teaspoon salt, sugar, tomatoes, and wine; increase heat to medium-high, and simmer until thickened and fragrant, about 8 minutes. Stir in reserved shrimp and accumulated juices, remaining 1 tablespoon garlic, and parsley and simmer until shrimp have heated through, about 1 minute longer. Off heat, stir in remaining 1 tablespoon olive oil. *I think I was thrown off by the flambe-ing and forgot to drain my canned tomatoes. This made for a very thin sauce, which I just reduced for longer than 8 minutes. Still turned out great!

6. While sauce simmers, add linguine or spaghetti and remaining 1 tablespoon salt to boiling water, stir to separate pasta, cover, and cook until al dente; reserve 1/3 cup pasta cooking water and drain pasta. Transfer drained pasta back to now-empty Dutch oven or stockpot; add about 1/2 cup sauce (without shrimp) and 2 to 3 tablespoons reserved pasta cooking water; toss to coat. Divide pasta among warm serving bowls, top with a portion of sauce and shrimp, and serve immediately.

Source: America's Test Kitchen TV Show Cookbook

Friday, October 22, 2010

Saffron Risotto with Butternut Squash

DSCN7041_labeled

I've been thinking about making this risotto ever since last winter when I found the recipe on FoodNetwork. Bob and I love butternut squash, and I'm always looking for new ways to make risotto. Also, this is my first recipe using saffron! I actually found a (relatively) inexpensive jar at Trader Joe's and have been waiting for a recipe that calls for it. I'm not sure I really know what saffron tastes like, even after eating this dish ... maybe it was too inexpensive that the flavor suffered? Regardless, this was a great meal that we both loved. The butternut squash is so sweet and nicely counterbalances the salty turkey bacon (or pancetta). The shallots sort of melt into the sauce, which is creamy and smooth. Risotto takes patience, but this one is well worth the effort!

Saffron Risotto with Butternut Squash

Ingredients:
1 butternut squash (approximately 2 pounds)
2 tablespoons olive oil
Kosher salt and freshly ground black pepper
6 cups chicken stock, preferably homemade (I used broth)
6 tablespoons (3/4 stick) unsalted butter
2 ounces pancetta, diced (or the equivalent of turkey bacon)
1/2 cup minced shallots (2 large)
1 1/2 cups Arborio rice (10 ounces)
1/2 cup dry white wine
1 teaspoon saffron threads
1 cup freshly grated Parmesan cheese (I did not use this much - just grated in a good amount)

Directions:
Preheat the oven to 400 degrees.
1. Peel the butternut squash, remove the seeds, and cut it into 3/4-inch cubes. You should have about 6 cups. Place the squash on a sheet pan and toss it with the olive oil, 1 teaspoon salt, and 1/2 teaspoon pepper. Roast for 25 to 30 minutes, tossing once, until very tender. Set aside.

2. Meanwhile, heat the chicken stock in a small covered saucepan. Leave it on low heat to simmer.

3. In a heavy-bottomed pot or Dutch oven, melt the butter and saute the pancetta and shallots on medium-low heat for 10 minutes, until the shallots are translucent but not browned. Add the rice and stir to coat the grains with butter. Add the wine and cook for 2 minutes.

4. Add 2 full ladles of stock to the rice plus the saffron, 1 teaspoon salt, and 1/2 teaspoon pepper. Stir, and simmer until the stock is absorbed, 5 to 10 minutes. Continue to add the stock, 2 ladles at a time, stirring every few minutes. Each time, cook until the mixture seems a little dry, then add more stock. Continue until the rice is cooked through, but still al dente, about 30 minutes total.

5. Off the heat, add the roasted squash cubes and Parmesan cheese. Mix well and serve.

Tuesday, October 19, 2010

Cinnamon Ice Cream

DSCN7068_labeled

I hope everyone is enjoying fall! It seems to be zipping by for me. I was able to celebrate my birthday this past weekend by visiting a local winery for an Octoberfest celebration. The weather here was perfect!

The smell of cinnamon always reminds me of fall - whether it's being added to an apple pie or mixed into a pumpkin treat. Ice cream seems like the perfect accompaniment to a warm apple dessert, and what better version than Cinnamon Ice Cream?!

This ice cream is a bit more work than your typical ice cream recipe, but it's worth the work. Infusing the cream with cinnamon sticks provides the perfect cinnamon flavor, and cooking the custard ensures that it's safe for you and your family to eat!

Cinnamon Ice Cream

Ingredients:
1 cup whole milk
3/4 cup granulated sugar
Pinch of salt
8 - 10 3-inch cinnamon sticks, broken up
2 cups heavy cream, divided
5 egg yolks

Directions:
1. Warm the milk, sugar, salt, cinnamon sticks, and 1 cup of the heavy cream in a medium saucepan. Once warm, cover, remove from the heat, and let steep at room temperature for 1 hour.

2. Rewarm the cinnamon-infused milk mixture. Remove the cinnamon sticks with a slotted spoon and discard them. Pour the remaining 1 cup heavy cream into a large bowl and set a mesh strainer on top.

3. In a separate medium bowl, whisk together the egg yolks. Slowly pour the warm mixture into the egg yolks, whisking constantly, then scrape the warmed egg yolks back into the saucepan.

4. Stir the mixture constantly over medium heat with a heatproof spatula, scraping the bottom as you stir, until the mixture thickens and coats the spatula (should reach 170 degrees F on an instant-read thermometer). Pour the custard through the strainer and into the cream. Stir until cool over an ice bath.

5. Chill the mixture thoroughly in the refrigerator, preferably overnight, then freeze it in your ice cream maker according to the manufacturer’s directions.

Yield: About 1 quart

Source: Adapted from Brown Eyed Baker, adapted from The Perfect Scoop by David Lebovitz

Thursday, October 7, 2010

Restaurant Style Hummus

DSCN7039_labeled

DSCN7037_labeled

Hummus is one of my favorite snacks, but until recently I had never made it at home. This version from Cook's Illustrated is super creamy and flavorful. I love the kick of cayenne, and the texture is perfect. Hummus is great with a variety of raw veggies or my personal favorite - Stacy's Simply Naked Pita Chips!

Restaurant Style Hummus

Ingredients:
3 tablespoons juice from 1 to 2 lemons
1/4 cup water
6 tablespoons tahini , stirred well
2 tablespoons extra-virgin olive oil, plus extra for drizzling
1 14-ounce can chickpeas , drained and rinsed
1 small garlic clove , minced or pressed through garlic press (about 1/2 teaspoon)
1/2 teaspoon table salt
1/4 teaspoon ground cumin
Pinch cayenne
1 tablespoon minced fresh cilantro or parsley leaves

Directions:
1. Combine lemon juice and water in small bowl or measuring cup. Whisk together tahini and 2 tablespoons oil in second small bowl or measuring cup. Set aside 2 tablespoons chickpeas for garnish.

2. Process remaining chickpeas, garlic, salt, cumin, and cayenne in food processor until almost fully ground, about 15 seconds. Scrape down bowl with rubber spatula. With machine running, add lemon juice-water mixture in steady stream through feed tube. Scrape down bowl and continue to process for 1 minute. With machine running, add oil-tahini mixture in steady stream through feed tube; continue to process until hummus is smooth and creamy, about 15 seconds, scraping down bowl as needed.

3. Transfer hummus to serving bowl, sprinkle reserved chickpeas and parsley/cilantro over surface, cover with plastic wrap, and let stand until flavors meld, at least 30 minutes. Drizzle with olive oil, if desired, and serve.

Source: Adapted from Cook's Illustrated

Tuesday, October 5, 2010

The Flavors of Fall!

Fall is one of my favorite times of year - basically I love September through December! Last year I really embraced fall and tried some great recipes. I've listed these below and will hopefully add many more this season!

Note: I've also updated my sidebar to reflect the change of season :)
This is one of my favorite recipes I made last year. It was fantastic! The fall-spiced crust coated with chocolate, the creamy pumpkin filling, and of course the festive topping - this recipe is a must-try!

DSCN3552_labeled
Pumpkin bread is just about my favorite fall treat. This bread is moist and flavorful. The fall spices really come through.

DSCN3891_labeled
One of my favorite fall activities is apple picking. I always pick a ton of apples to have plenty for lunches and baking. These bars are sooo delicious - the flavor of a caramel apple with an oat-y crust, yum!

DSCN3973_labeled
A great basic sugar cookie with a fantastic fall design. These cookie are sure to impress!

DSCN4101_labeled
This is a hearty yet not heavy soup. A perfect end to a chilly autumn day!

DSCN4081_labeled
Not strictly a fall recipe, this tomato tart is a great party appetizer. The tomatoes don't have to be at their peak season because they are baked, and the pie crust and Herbes de Provence give the dish a very comforting quality.

DSCN4120_labeled
Those cute little Pumpkin Spice Hershey's Kisses available only this time of year can be baked into a chocolatey treat!

DSCN4211_labeled
Save your (*)-$'s and make one of these flavorful drinks at home!

DSCN1494
Use your favorite fall-themed cookie cutters to create adorable cinnamon-sugar tortillas to dip in a sweet pumpkin dip!

DSCN4194_labeled
Two classic seasonal fruits blended into a sweet yet savory soup with a warming hint of curry.

DSCN4316_labeled
A deliciously salty-sweet candy that's a nut-free alternative to the traditional peanut-brittle.

DSCN4284_labeled
What says Halloween more than popcorn balls?! This is my favorite recipe for them!

DSCN4408_labeled
These little bites combine an Oreo crust with pumpkin cheesecake and caramel - enough said.

DSCN4164_labeled
Pumpkin with the flavors of a magic bar in a bite-sized package.

DSCN4341_labeled
A classic Julia Child recipe that's creamy and smooth!

DSCN4074_labeled
Another great party appetizer! These tasty tarts combine pumpkin, spinach, chicken, and cheese for a perfect bite.

DSCN4261_labeled
More like candy than a side-dish, this acorn squash is filled with brown sugar and butter - delish!

DSCN4730_labeled
Get in some practice before Thanksgiving with this amazing recipe. I was blown away by how good this was! So juicy and flavorful.

DSCN2301_labeled
The name says it all - sweet fruit combined with savory cheese; this is a great main dish to serve to company!

DSCN3057_labeled
Combine this flavorful, spicy soup with a grilled cheese sandwich and you have a perfect meal!

DSCN2955_labeled
A delicious dip for those crisp, juicy apples picked from an orchard of your local grocery store!

Friday, October 1, 2010

Allspice Crumb Muffins

DSCN7008_labeled

DSCN7014_labeled

Happy Fall! It seems like the weather in my area has changed from summer to fall since my last post! Can you believe it's already October???

I've been MIA lately but for good reason - we closed on our new house and moved in! We are still working on getting settled, but my first priority was establishing a functional kitchen. I'm really looking forward to getting back into a routine that involves more cooking, baking, and blogging!

I've had my eye on these Allspice Crumb Muffins for quite some time, and I decided that they would be the perfect breakfast for my wonderful family members who graciously gave up their Saturday morning to help us on moving day. These muffins were great - incorporating the delicious spices of fall.

Stay tuned for some great fall recipes coming soon! :)

Allspice Crumb Muffins

Ingredients:
For the streusel:
1/2 cup all-purpose flour
1/2 cup light brown sugar, packed
1/2 teaspoon ground allspice*
5 tablespoons cold unsalted butter, cut into small pieces

For the muffins:
2 cups all-purpose flour
1/2 cup sugar
1 tablespoon baking powder
1/2 teaspoon ground allspice*
1/4 teaspoon salt
1/4 cup light brown sugar, packed
8 tablespoons unsalted butter, melted and cooled
2 large eggs
3/4 cup whole milk
1/4 teaspoon vanilla extract
zest of 1 lemon, optional

*When I'm out of allspice and can't get to the store, I make a similar-tasting substitute by mixing 2 parts ground cinnamon, 1 part ground nutmeg, and 1 part ground cloves.

Directions:
Center a rack in the oven and preheat to 375F.
1. Line a 12-cup muffin tin with paper liners or spray with cooking spray. Place the muffin pan on a baking sheet.

2. For the streusel, put the flour, brown sugar, and allspice in a small bowl and sift ingredients through your fingers to blend. Add the cold pieces of butter and toss to get irregularly shaped crumbs. Set aside in refrigerator.

3. In a large bowl, whisk together the flour, sugar, baking powder, allspice, and salt. Stir in the brown sugar, making certain there are no lumps.

4. In a large glass measuring cup or another bowl, whisk the melted butter, eggs, milk, and vanilla extract together until well combined.

5. Pour the liquid ingredients over the dry ingredients and, with a whisk or rubber spatula, gently but quickly stir to blend. The batter should be lumpy. Stir in lemon zest if using.

6. Divide the batter evenly among the muffin cups. Sprinkle some streusel over each muffin, then use your fingertips to gently press the crumbs into the batter.

7. Bake for about 20 minutes or until the tops are golden and a thin knife inserted into the center of the muffins comes out clean. Transfer the pan to a rack and cool for 5 minutes before carefully removing each muffin to the cooling rack.

Source: Baking from My Home to Yours by Dorie Greenspan, as featured on Meet Me in the Kitchen

  © Blogger template Brownium by Ourblogtemplates.com 2009

Back to TOP