Does anyone still read my blog?! I am SO behind on posts it's ridiculous! We are forging full speed ahead in the house hunting process, and it is time-consuming! We had our first "house heart-break" this week - a house we were seriously considering was sold right from under us. We found out the night before we were going to see it and possibly make an offer :-( Very sad, but we've decided not to let time go by wallowing in our sorrow, so we're on to the next. I don't want to rush a purchase by any means, but the thought of being in a home by fall and hosting Thanksgiving is so exciting. I'll keep you posted!
Another reason for my lack of posts is my job. I decided to be brave and take on an area of research VERY foreign to me for my postdoc . . . either I'm brave or stupid because it is SO hard. I feel like I know nothing and I'm starting from scratch. I know that beginning any new job is difficult and there will always be an adjustment period, but I hate that part! I guess I thought that with all my experience I'd be able to pick things up faster - nope!
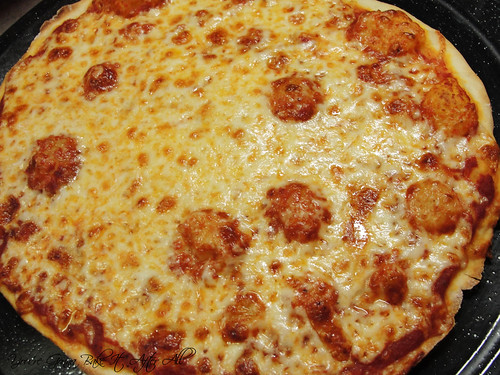
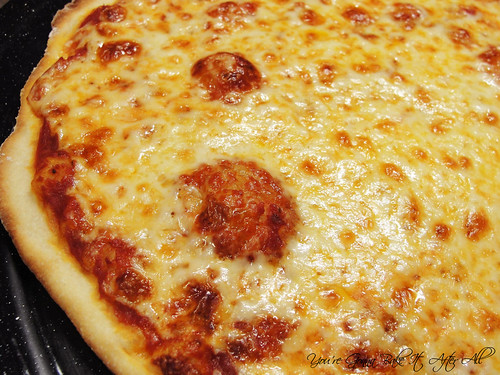
While I have not been cooking nearly as much as I should, I have managed to make a few things these past few weeks. One of my favorites is this Thin-Crust Pizza. The dough is so simple to put together, and it rises overnight in the fridge so the actual time preparing the pizza the day of is very minimal. The dough rolls out nicely, and the toppings couldn't be easier. We really liked this pizza, and I think it would be great with any of YFT (your favorite toppings).
I will try my hardest not to let this much time go by between posts again! :)
Thin-Crust Pizza
Ingredients:
For the dough:
1 3/4 - 2 cups (8 3/4 to 10 ounces) unbleached all-purpose flour, plus extra for the work surface
1/2 teaspoon instant or rapid-rise yeast
1/2 teaspoon honey
1/2 teaspoon table salt
1/4 cup olive oil
3/4 cup warm water (110 degrees)
For the toppings:
1 cup (or a little more) Quick Tomato Sauce for Pizza (recipe follows)
8 ounces whole milk mozzarella cheese, shredded (about 2 cups; fresh is NOT recommended because of the high moisture content - use shrink-wrapped kind)
Directions:
1. To make the dough, pulse 1 3/4 cups flour, the yeast, honey, and salt in a food processor fitted with a dough blade, if possible. Process until combined, about 5 seconds.
2. With the machine running, pour the oil and then the water through the feed tube and process until the dough forms a ball, about 30 seconds. If after 30 seconds the dough is sticky and clings to the blade, add the remaining 1/4 cup flour 1 tablespoon at a time. Turn the dough out onto a work surface.
3. Divide the dough in half and place each piece in a gallon-sized, heavy-duty zipper-lock bag and seal. Refrigerate overnight or up to 48 hours.
4. One hour before baking the pizza, adjust an oven rack to the lowest position, set a pizza stone on the rack, and heat the oven to 500 degrees.
5. Remove the dough from the plastic bags. Set each piece in the center of a lightly floured large sheet of parchment paper. Cover each with two 18-inch lengths of plastic wrap, overlapping them in the center; let the dough rest for 10 minutes.
6. Setting one piece of dough aside, roll the other into a 14-inch round with an even thickness, using the tackiness of the dough against the parchment to help roll it. If the parchment wrinkles, flip the dough sandwich over and smooth the wrinkles with a metal bench scraper.
7. Peel the plastic wrap off the top of the rolled dough. Spread 1/2 cup of the tomato sauce to the edges of the dough. Sprinkle with 1 cup of the cheese.
8. Slip the dough with the parchment onto a pizza peel or rimless baking sheet. Slide the pizza, parchment and all, on to the hot pizza stone. Bake until a deep golden brown, about 10 minutes. Remove the pizza from the oven with a pizza peel or pull the parchment with the pizza onto a baking sheet. Transfer the pizza to a cutting board, slide the parchment out from under the pizza, and slide it onto a wire rack. Cook 2 minutes until crisp; slide to a cutting board, cut into wedges, and serve.
9. While the first pizza is baking, repeat steps 6 and 7 to roll and top the second pizza; allow the baking stone ot reheat for 15 minutes after baking the first pizza, then repeat step 8 to bake the second pizza.
Quick Tomato Sauce for Pizza
Ingredients:
1 14.5-ounce can crushed tomatoes
1 tablespoon olive oil
1 medium garlic clove, minced or pressed through a garlic press (about 1 teaspoon)
table salt and ground black pepper
Directions:
1. Process the tomatoes in a food processor until smooth, about 5 pulses.
2. Heat the oil and garlic in a medium saucepan over medium heat until the garlic is fragrant, about 30 seconds. Stir in the tomatoes; bring to a simmer and cook, uncovered, until the sauce thickens, about 15 minutes. Season with salt and pepper to taste.
Source: The Complete America's Test Kitchen TV Show Cookbook