Search This Blog

Thursday, March 25, 2010

Giveaway Winner!

First of all, THANK YOU so much to all of you who entered my giveaway. There were so many sweet comments, and I enjoyed reading them. It was fun to see which item each of you wanted, and some of you gave a reason for your preference, which was great.

According to random.org, the winner is . . .


Congratulations to Astrid! She chose the pizzelle maker! I hope she'll do a post about her first batch of pizzelles sometime soon.

Astrid, please email me your mailing address ASAP so I can get your gift to you!

Special thanks to CSNstores.com for sponsoring this giveaway.

Happy Thursday everyone!

Wednesday, March 24, 2010

Chinese Slaw

Today is the last day to enter my giveaway - contest ends at 10pm CST!

My mom has been making this slaw for years, and I'm sure there are many versions of it floating around, but we really love it so I thought I'd share ours. This is not your traditional slaw - it has a light-tasting vinaigrette dressing and a nice crunch from the Ramen noodles, sunflower seeds, and almonds (if you use them!). The weather here in Chicago is starting to turn milder, so I figured it was a good time to share this slaw. It always reminds me of barbecues and summer, but it's great any time of year.

Chinese Slaw

Ingredients:
Slaw:
1 pound shredded cabbage (bagged; I like the kind with carrots and green/purple cabbage for color)
2 packages Ramen dry soup mix (beef flavored is traditionally used but I've made it with chicken)
1 bunch green onions, sliced thin
1 small package sliced almonds (about 2/3 cup), toasted (or use roasted Almond Accents)*
1 cup dry roasted sunflower seed kernels

Dressing:
Spices from Ramen noodles
1/2 cup sugar
1 cup salad oil (I used Canola)
1/3 cup cider vinegar

*We eliminate these if I'm eating it because of my nut allergy. No one seems to notice or mind too much :)

Directions:
1. Crush Ramen package before opening to crumble noodles. Remove seasoning packet and prepare dressing. Refrigerate dressing.

2. Layer slaw ingredients in a bowl, cover and refrigerate.

3. Toss slaw with dressing just before serving.

Source: My mom (through family friends)

Monday, March 22, 2010

Oven-Fried Honey Chicken Nuggets

Remember, two more days to enter the giveaway!


I've had this recipe ready to post for quite some time. It actually brings back a great memory because Bob made it for us! Bob's a great cook but rarely has time to practice his craft. Dinner just tastes better when someone else makes it, at least that's what my mom says :)

We really loved this recipe. There's a nice sweetness from the honey, and the balsamic adds another element to balance the flavor. I love cooking with toasted panko - it makes a nice, crispy crust. These chicken nuggets are healthy and quick to whip up. They are great by themselves or dipped in your favorite sauce!

Oven-Fried Honey Chicken Nuggets

Ingredients:
1/2 cup honey
2 Tablespoons balsamic vinegar
1 1/2 cups Panko (or dried bread crumbs)
Olive oil cooking spray
1 pound boneless, skinless chicken breast, cut into bite-sized pieces

Directions:
Preheat oven to 375F.
1. Line a large baking sheet with foil. Spray with cooking spray.

2. In a shallow bowl, whisk together honey and vinegar. Set aside.

3. Place bread crumbs in a small saute pan and toast lightly over low heat for about 3 - 4 minutes, until lightly brown. Transfer toasted bread crumbs to a shallow dish or pie plate.

4. Dip chicken in honey mixture, then roll in bread crumbs. Place on prepared baking sheet in a single layer.

5. Bake for 20 - 30 minutes, or until cooked through.

Source: Adapted from Macaroni and Cheesecake

Friday, March 19, 2010

Lighter, Quicker Eggplant Parmesan

Don't forget to enter my giveaway!

DSCN5386_labeled

DSCN5401_labeled

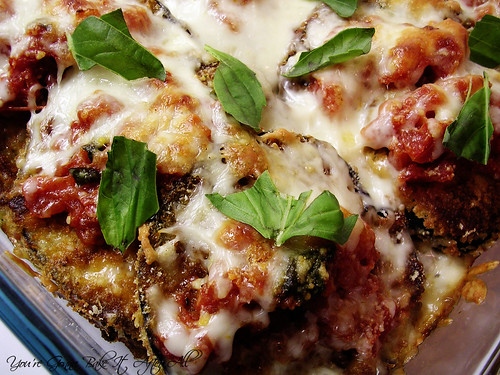
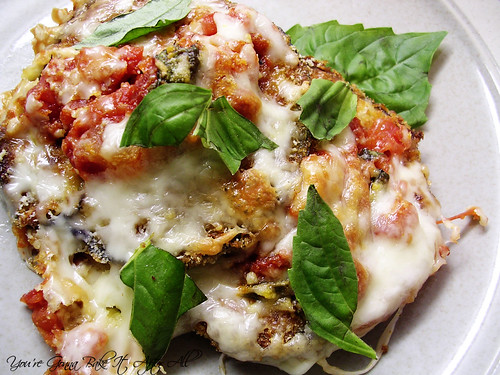
This year on Friday nights during Lent, I've been trying to make filling meatless meals that stand on their own, rather than just eliminating the meat from our favorite dishes. One of my favorite vegetarian entrees is Eggplant Parmesan. Ever since I tried some of my friend's at Maggiano's in high school, I've been hooked. When I saw this in my Cook's Illustrated All-Time Best Recipes Cookbook that came with my subscription, I knew I had to make it. Annie posted this recipe as well and raved about how great it was, so I knew it had to be good.

This recipe is called "Lighter, Quicker Eggplant Parmesan." Well, it's not exactly "quick," so I guess that's a relative term. I admit that, because it was Friday night, I went at a leisurely pace and did not utilize the time when the eggplant slices were draining, so that added on some extra time.

The "lighter" term is relative too, because yes this dish uses less oil than if you fry the eggplant, but it still has a ton of yummy Parmesan and mozzarella. Just thinking about it makes me want some! It was really, really delicious. The breading on the eggplant is great with lots of Parmesan and bakes up nice and crisp. It even stays crisp after being topped with the tomato sauce and cheese. I really love the quick little sauce in this recipe; it has a ton of flavor and a nice spicy kick from the red pepper flakes. As good as this was the first night, Bob and I actually thought it was better the next day (and the next day, and the next day - it make a lot!)

Lighter, Quicker Eggplant Parmesan

Serves 6 to 8

Ingredients:
For the eggplant:
2 pounds globe eggplant (2 medium eggplants), cut crosswise into 1/4-inch thick rounds
1 Tablespoon kosher salt
8 slices high-quality white sandwich bread (about 8 ounces), torn into quarters
2 ounces Parmesan cheese, grated (about 1 cup)
Table salt and ground black pepper
1 cup unbleached all-purpose flour
4 large eggs (I needed 5)
6 Tablespoons vegetable/Canola oil

For the tomato sauce:
3 14.5-ounce cans diced tomatoes (I used petite cut)
2 Tablespoons extra-virgin olive oil
4 medium garlic cloves, minced or pressed through garlic press (about 1 generous Tablespoon)
1/4 teaspoon red pepper flakes
1/2 cup coarsely chopped fresh basil leaves
Table salt and ground black pepper

8 ounces whole-milk or part-skim mozzarella, shredded (2 cups)
1 ounce Parmesan cheese, grated (about 1/2 cup)
10 fresh basil leaves, torn, for garnish

Directions:
1. For the eggplant: Toss half of the eggplant slices and 1 1/2 teaspoon kosher salt in a large bowl until combined; transfer salted eggplant to a large colander set over a bowl. Repeat with remaining eggplant and kosher salt, placing second batch in colander on top of first. Let stand until eggplant releases about 2 Tablespoons liquid, 30 to 45 minutes. Arrange eggplant slices on triple layer paper towels; cover with another triple layer paper towels. Firmly press each slice to remove as much liquid as possible, then wipe off excess salt.

2. While eggplant is draining, adjust oven racks to upper- and lower-middle positions, place rimmed backing sheet on each rack (I lined mine with aluminum foil to help with clean-up), and heat oven to 425F. Pulse bread in food processor to fine, even crumbs, about 15 1-second pulses (you should have about 4 cups). Transfer crumbs to a pie plate and stir in 1 cup Parmesan, 1/4 teaspoon salt, and 1/2 teaspoon pepper; set aside. Wipe out bowl (do not wash) and set aside.

3. Combine flour and 1 teaspoon pepper in large zipper-lock bag; shake to combine. Beat eggs in second pie plate. Place 8 to 10 eggplant slices in bag with flour; seal bag and shake to coat eggplant. Remove eggplant slices, shaking off excess flour, dip in eggs, let excess egg run off, then coast evenly with bread crumb mixture; set breaded slices on a wire rack set over baking sheet. Repeat with remaining eggplant.

4. Remove preheated baking sheets from oven; add 3 Tablespoons oil to each sheet, tilting to coat evenly with oil. Place half of breaded eggplant on each sheet in a single layer; bake until eggplant is well browned and crisp, about 30 minutes, switching and rotating baking sheets after 10 minutes, and flipping eggplant slices with wide spatula after 20 minutes. Do not turn off oven.

5. For the sauce: While eggplant bakes, process 2 cans diced tomatoes in food processor until almost smooth, about 5 seconds. Heat olive oil, garlic, and red pepper flakes in large heavy-bottomed saucepan over medium-high heat, stirring occasionally, until fragrant and garlic is light golden, about 3 minutes; stir in processed tomatoes and remaining can of diced tomatoes. Bring sauce to boil, then reduce heat to medium-low and simmer, stirring occasionally, until slightly thickened and reduced, about 15 minutes (you should have about 4 cups). Stir in basil and season to taste with salt and pepper.

6. To assemble: Spread 1 cup tomato sauce in bottom of 13- by 9-inch baking dish. layer in half of eggplant slices, overlapping slices to fit; distribute 1 cup sauce over eggplant; sprinkle with half of mozzarella. Layer in remaining eggplant and dot with 1 cup sauce, leaving majority of eggplant exposed so it will remain crisp ; sprinkle with 1/2 cup Parmesan and remaining mozzarella. Bake until bubbling and cheese is browned, 13 to 15 minutes. Cool 10 minutes, scatter basil over top, and serve, passing remaining tomato sauce separately.

Source: Cook's Illustrated All-Time Best Recipes

Wednesday, March 17, 2010

My First Giveaway!

Happy St. Patrick's Day! Like I said Monday, I don't have any St. Pat's Day recipes for you this year, but I do have a fun giveaway instead! This is the first one on You're Gonna Bake It After All!

I was contacted by a representative from CSNstores.com about a giveaway for my readers. CSN carries just about everything, from unique furniture like counter stools and bar sets (my husband will go crazy for that one!) to my personal favorites, cookware and bakeware.

I always like to have options, so I've decided to make this an interactive giveaway - the winner gets to choose his/her prize! So, you'll have to decide, would you rather have:

a beautiful bamboo cutting board for all your chopping and dicing needs,


a pizelle maker for homemade tasty Italian cookies,


or a wine rack to easily store your favorite beverages?


There are 2 ways to enter:

1. Leave a comment telling me which of these prizes you'd like to receive should you win.

2. Blog about this giveaway and leave a separate comment with a link to the post to make sure I know about it.

Contest is open until next Wednesday, March 24, 10pm CST, and is limited to US and Canadian residents only (I apologize to my international readers!)

**Make sure to either leave your email address or check back next Thursday morning to see if you're a winner. At that point I'll give you 24 hours to give me your email address or I'll have to choose another winner. Good luck!!!! :)

Monday, March 15, 2010

Southwestern Roasted Chicken

This year I'm not doing any St. Patrick's Day recipes, but check out these previous posts: St. Patrick's Day Sugar Cookies, Grasshopper Pie, and Turkey Pastrami Reuben Sandwiches!


DSCN5230_labeled

I love roasting a whole chicken in the oven. The smell is amazing and, when cooked properly, the chicken is flavorful and juicy. I made Pam's Spicy Roasted Chicken last year for Easter, and it was such a hit that I quickly bookmarked her Southwestern Roasted Chicken as soon as it was posted.

This chicken is fantastic! It's so simple to make and the blend of spices is simply delicious. The leftovers are great for any Mexican dish - think quesadillas, enchiladas, Mexican Pizzas, tostadas, Tortilla Soup, you name it!

Southwestern Roasted Chicken

Ingredients:
1 4 - 5 pound chicken
Onion powder
Chili powder
Sea or Kosher salt
Freshly ground black pepper
Oregano
Cumin
Garlic Powder
1/2 sweet yellow onion, quartered
1 lime
6 cloves of garlic
Handful of fresh cilantro

Directions:
Preheat oven to 275F.
1. Clean chicken and pat dry. Squeeze half the lime juice on the outside of the bird and the other half inside the cavity. Sprinkle all of the seasonings evenly over the entire bird. Season the back first then flip it over and season the breast side.

2. Place onion and garlic inside the cavity along with the cilantro and used lime halves.

3. Place chicken on a roasting tray in a tinfoil lined baking dish. Place the meat thermometer in the thickest part of the thigh, making sure not to touch bone. Roast uncovered for 3 1/2 - 4 hours or until the meat thermometer reads 170 - 180 F (I think USDA says 165 is safe). To baste: begin basting bird after 2 hours and repeat every 1/2 hour after. This will yield a sticky and slightly crispy skin. If you want a crispy skin, don't baste the last hour and turn the heat up to 350F for the last 5 minutes of cooking.

NOTE: I think an oven safe instant-read meat thermometer is critical for perfect baked chicken. These times are just approximate, and ovens vary a lot (at least mine does!) I was short on time when I made this so I turned the heat up to about 375 - 400F and just monitored with my meat thermometer. I made sure that the skin didn't get too brown (if so, just cover with foil). It ended up cooking much faster and was perfectly moist and juicy, thanks to the thermometer!

4. Remove from oven and let the bird rest for at least 10 minutes before carving.

Source: Adapted from For the Love of Cooking

Friday, March 12, 2010

Judy's Chicken

**Thank you for all of your sweet comments on my last post. I really appreciate your support :) **
My parents' friend Judy made this chicken for them several years ago, and they loved it, so much that my mom made it when I was home from college for a break. I fell in love with it as well. It reminds me of a dish I made in a French cooking class at our local grocery store many years ago. Although this recipe is much more Americanized, it's still delicious. Plus, it's super easy to make. I know some people have issues about cooking with canned soup, but I don't! For lack of a better name, we call it Judy's Chicken, even though I'm sure she acquired the recipe from someone else. I usually halve this recipe and make 2 chicken breasts. Sometimes I'll make the same amount of sauce for the full recipe to have a bunch left over for rice - I love sauce!
Shown here served over brown rice with some some of my favorite veggies - haricots verts.

Judy's Chicken

Ingredients:
4-6 boneless, skinless chicken breasts
1 package (2 cups) grated Swiss cheese (or 1 slice per chicken breast)
1 can cream of mushroom soup (I use Healthy Request, red. fat/red. sodium)
3/4 cup sour cream (I use light)
1/2 cup white wine
salt and pepper
cooking spray
1/2 cup breadcrumbs (regular or Italian-style)

Directions:
1. Place chicken in a 9x13-inch pan sprayed with cooking spray. Sprinkle with salt, pepper, and Swiss cheese.

2. In a bowl, mix sour cream, mushroom soup, and wine. Spoon over chicken. Sprinkle with breadcrumbs.

3. Bake uncovered at 350F for 45 minutes to 1 hour.

Great served over hot, white or brown rice.

Source: Adapted from a recipe by Judy D.

Wednesday, March 10, 2010

Back on Friday

Just wanted to write a quick note that I'll be back to blogging (i.e. posting and reading your lovely blogs) on Friday. My grandmother passed away over the weekend, and I've been back home. My grandmother was one of the most amazing women, and I am so blessed to have had her in my life. While my family is so thankful for the time we had with her (she was almost 94!), we are devastated that she is gone. I will dedicate some recipes to her memory in the future, but in the meantime I will work on playing catch-up. Back with a new recipe on Friday.

Maw Maw

Monday, March 8, 2010

Garlic Parmesan Oven Fries


This is my March submission for Reeni's Side Dish Showdown. This month's theme is Anything Goes.
Side Dish Showdown Blogger Event

These oven fries are so delicious! They're crispy, flavorful, and the perfect accompaniment to any main dish. With so few ingredients, they are so easy to whip up on a weeknight. You don't even have to peel the potatoes! Once they're in the oven, you can concentrate on making the rest of the meal. The original recipe served 4, so I cut it in half. You can easily scale up depending on how many you're serving.

Looking for ideas for what to serve with these? How about a Guacamole Turkey Burger or a Pepper Jack Stuffed Turkey Burger?!

Garlic Parmesan Oven Fries

Serves 2

Ingredients:
1 large russet potato, scrubbed and dried
2 Tablespoons extra virgin olive oil
1/2 teaspoon kosher salt
1/2 garlic clove, minced
2 Tablespoons grated Parmigiano-Reggiano cheese
1 teaspoon dried parsley (or 1 Tablespoon chopped fresh flat leaf)

Directions:
1. Preheat oven to 425F.

2. Cut the potatoes in half lengthwise. Then cut the halves lengthwise into fourths to make 8 wedges (depending on the size of your potato, you may wish to make more wedges).

3. Toss the potatoes with the olive oil, salt, and minced garlic in a large bowl. Place onto a metal baking sheet (I lined mine with aluminum foil sprayed with cooking spray). Spread into a single layer

4. Roast the potatoes for 30 - 35 minutes, until cooked through, brown, and crispy. Don't shake or turn the fries while they're cooking. The longer they sit in contact with the metal baking sheet, the crisper they get. *My garlic burned a little, probably because of my oven, so keep a close watch on them towards the end.

5. Toss the fries in a big bowl with the cheese and parsley, and serve hot.

Source: Joelen's Culinary Adventures, originally from Tyler Florence

Friday, March 5, 2010

Baby Bluebird Cupcakes

DSCN5409_labeled

DSCN5444_labeled

The second I saw these cupcakes last spring, I knew I wanted to make them, but I had already planned to make the Spring Chick and Carrot Cupcakes for Easter, so I decided to wait until this spring. This is a very versatile recipe - you can use any cupcake and frosting you like. One of my coworkers birthdays was coming up, and last year she raved and raved about the Tres Leches Coconut Cupcakes, so I decided to use those as the base. I thought they'd work particularly well because I remembered that they bake up with very flat tops, and this recipe specifies to use a paring knife to flatten the cupcake top if necessary.

These were a HUGE hit. Everyone loved the cute little bluebirds and said the cupcakes were amazing. I heard words like "food of the gods," "divine," "transcending," "incredible" - it was pretty funny. Unfortunately I didn't try one because I gave up desserts for Lent, but I know how good the Tres Leches Coconut Cupcakes are on their own, so what's not to like? Ina Garten's voice pops in my mind saying "Coconut, chocolate, how bad can that be?" :)

Baby Bluebird Cupcakes

Ingredients:
1 batch of your favorite cupcakes (I used Tres Leches Coconut Cupcakes)
2 cups of chocolate frosting (I used canned)
1/2 cup white frosting (I used canned)
Shredded coconut, roughly 1/2 bag
Chocolate, approximately 1/2 ounce

Supplies:
Pastry bags fitted with large round, medium round, and small "V" or leaf tips
Blue and yellow food coloring gel/liquid

Directions:
1. Toast the shredded coconut in a medium skillet over medium/high heat, transfer to a shallow dish, and let cool completely.

2. Level the cupcakes if necessary with a small paring knife.

3. Lightly frost each cupcake with a thin layer of chocolate frosting, if desired. Some of my cupcakes had some of the 'tres leches' still on top so I just covered that in toasted coconut and advanced to step 4.

4. Using a pastry bag fitted with a large round tip, pipe a ring or two of chocolate frosting around the top edge of each cupcake to form the border of the nest.

5. Sprinkle a large amount of toasted coconut over each cupcake, gently pressing it into the chocolate frosting. Shake off the excess.

6. Color some of the white frosting light blue. Using a pastry bag fitted with a wide round tip, pipe three mounds of frosting into the center of each nest to make the birds' bodies. If there is a little peak on the top of the mounds, wait a few minutes until the icing begins to set and then gently smooth it down with a toothpick or finger.

7. Color the remaining white frosting yellow, and fill a pastry bag fitted with a small "V" tip. Pipe a beak onto each bird.

8. Melt the chocolate in a microwave safe bowl, in 20 - 30 second intervals until completely melted. Dip a toothpick into the chocolate and then dot eyes onto each bird.

Source: Adapted from Annie's Eats, original inspiration from Martha Stewart

Wednesday, March 3, 2010

Happy 1st Birthday . . .

to my blog that is! My blog turns 1 today, so I decided to bake it a cake:

DSCN5343_labeled_2
Just kidding, I really baked this cake for a friend's 30th birthday, but we can pretend it's for my blog.

When I started this little blog, I didn't know what to expect. Would I have the time and energy to keep up with it? Would I be able to maintain the pace of constantly trying new recipes, photographing the finished products, and documenting the results?

I can honestly say that I love this blog and what it's brought to my life. That may sound a bit overstated, but it's true. For the last few years, I felt like I didn't really have a lot of hobbies. Bob writes his own music, plays guitar, and golfs, but what did I do? In college there was only time for studying and well, partying. It seemed like the only thing I really excelled at was school, and since my graduate classes ended in 2006 and I was left with the notoriously unfulfilling research portion of the degree, I needed a hobby.

I have always liked cooking. My mom is a fantastic cook, and I loved watching her. Sometimes she wonders how my sister and I know how to do something in the kitchen because she never formally taught us, and we just tell her we learned by observing.

While I cooked some in college, and more after, I seemed to always resort to the same recipes. This blog challenges me to expand my culinary horizons - to try new techniques, to explore new flavors. It forces me to make time for my hobby now, rather than allow it to be something I intend for the future. I have come a long way since my first post, and I hope to go much further. So happy birthday little blog! I hope we celebrate many more years together :)


Now onto this recipe. My friend loves chocolate and coffee, so for his 30th birthday I wanted to make a cake that incorporated both. I turned to my trusty "Cake Bible" and decided to make a Mocha Cake of sorts - a double layer Chocolate Fudge Cake with Coffee Neoclassic Buttercream frosting.

Let me just say, this cake is fantastic! It's moist and delicious. The chocolate flavor is wonderful, and it's just a really, really good cake. The frosting is almost too indulgent, if that's possible - it's velvety, smooth, perfect. I like the coffee flavoring, but I think I'd love it flavored in many different ways as well. It was actually pretty simple to make because of Rose Levy Beranbaum's neoclassic method she developed; it eliminates the need to monitor the temperature of the sugars, which is always a good thing. I have so far made two cakes from this book, and both have been delightful. I can't wait to make more!

One of the things that Rose suggests in her book is to brush your cakes with liqueurs to keep them moist if you won't be eating them right away. Growing up on box mix cakes, I find that I crave that moisture that only seems possible when using oil instead of butter. When I first baked this cake and had to level off the top of each layer, I tried the cake - perfectly moist and delicious. I frosted it and let it sit out at room temperature over night under a foil tent, which Rose says is fine. The next day I was a little disappointed that the cake was more dry than it had been, despite being protected by a blanket of buttercream. No one else noticed and the cake got rave reviews, but I think if I would have brushed the cake with a little coffee flavored liqueur it might have stayed a little more moist.

Chocolate Fudge Layer Cake

Ingredients:
1 cup non-alkalized cocoa powder (such as Hershey's)
1 1/2 liquid cups boiling water
3 large eggs
1 1/2 teaspoons vanilla
3 cups (10.5 ounces) sifted cake flour
2 cups (15.25 ounces) firmly packed light brown sugar
1 1/4 teaspoons baking soda
3/4 teaspoon salt
1 cup (2 sticks) unsalted butter, must be softened

Directions:
Preheat oven to 350F.
1. Prepare two round 9-inch by 1 1/2-inch cake pans: grease, line bottom with parchment or wax paper, and then grease again and flour. (If you only have 2-inch high pans, either do 2/3 the recipe for 1 layer or 1 1/3 the recipe for 2 layers). (I used Crisco spray w/ flour instead, and it worked great!)

2. In a medium bowl, whisk together the cocoa and boiling water until smooth. Cool to room temperature.

3. In another bowl, lightly combine the eggs, 1/4 of the cocoa mixture, and vanilla.

4. In a large mixing bowl, combine the remaining dry ingredients and mix on low speed for 30 seconds. Add the butter and remaining cocoa mixture. Mix on low speed until the dry ingredients are moistened. Increase to medium speed (high speed if using a hand mixer) and beat for 1 1/2 minutes to aerate and develop the cake's structure. Scrape down the sides.

5. Gradually add the egg mixture in 3 batches, beating for 20 seconds after each addition to incorporate the ingredients and strengthen the structure. Scrape down the sides.

6. Scrape the batter into the prepared pans and smooth the surface with a spatula. The pans should be about 1/2 full. Bake 20 to 30 minutes or until a tester inserted near the center comes out clean and the cake springs back when pressed lightly in the center (mine took quite longer than 30 minutes).

7. Let the cakes cool in the pans on racks for 10 minutes. Loosen the sides with a small metal spatula and invert onto greased wire racks. To prevent splitting, reinvert so that tops are up and cool completely before wrapping airtight or frosting.

Coffee Neoclassic Buttercream Frosting

Ingredients:
6 large egg yolks
3/4 cup sugar
1/2 liquid cup corn syrup
2 cups (1 pound or 4 sticks) unsalted butter, must be softened
2 Tablespoons instant espresso powder (such as Medaglia d'Oro)
1 teaspoon boiling water

Directions:
1.Dissolve espresso powder into 1 teaspoon boiling water. Set aside to cool.

2. Grease a 1-cup heatproof glass measure and place near the range.

3. In a bowl, beat the yolks with an electric mixer until light in color. Meanwhile, combine the sugar and corn syrup in a small saucepan, preferably non-stick, and heat, stirring constantly, until the sugar dissolves and the syrup comes to a rolling boil. (The entire surface will be covered with large bubbles). Immediately transfer the syrup to the glass measure to stop the cooking.

4. If using an electric hand-held mixer, beat the syrup into the yolks in a steady stream. Don't allow the syrup to fall on the beaters or they will spin it onto the sides of the bowl. If using a stand mixer, pour a small amount of syrup over the yolks with the mixer turned off. Immediately beat at high speed for 5 seconds. Stop the mixer and add a larger amount of syrup. Beat at high speed for 5 seconds. Continue with the remaining syrup. For the last addition, use a rubber scraper to remove the syrup clinging to the glass measure. Continue beating until completely cool.

5. Gradually beat in the butter and the dissolved espresso. Place in an airtight bowl. Bring to room temperature before using.

Source: Cake and Buttercream - The Cake Bible by Rose Levy Beranbaum

Monday, March 1, 2010

Coconut Curry Chicken

DSCN5326_labeled

When I first moved to Chicago, I used to order a coconut curry chicken dish at Big Bowl. It was so delicious but rather expensive, so I wanted to find a recipe to make at home. I first found this recipe back in 2005 and have made it many times. I don't know the source exactly, but when I Googled it, an almost identical recipe came up from Cooking Light, so that is what I'll source. The nice thing is that this dish is relatively light. I think this recipe is fantastic, especially served over jasmine rice. Cooking the chicken in the coconut milk makes it very tender and flavorful. The bits of onions add a slightly sweet element, and the fresh basil adds another flavor dimension.

One day I took some leftovers to work and was eating in the lunch room. A friend in my lab told me it smelled just like her mom's curry, and considering her mom is a Chinese immigrant who is well versed in Thai curries, I took it as a compliment!

Coconut Curry Chicken

Ingredients:
2 teaspoons vegetable oil, divided
1 cup chopped onions
2 cups fresh basil leaves
1 clove garlic, crushed
2 teaspoons curry powder
1/2 teaspoon salt
1/8 teaspoon ground red pepper
1/2 pound skinless, boneless chicken breasts, cut into 1-inch pieces
3/4 cup light coconut milk
steamed rice (I prefer Jasmine) or Chinese egg noodles or rice noodles

Directions:
1. Prepare rice or noodles, if desired.

2. Heat 1 teaspoon oil in a large non-stick skillet over medium high heat until hot. Add onion and saute 3 minutes. Add basil, stir-fry for 2 minutes. Remove from pan and keep warm.

3. Heat remaining 1 teaspoon oil in skillet over medium-high heat. Add garlic and stir-fry 30 seconds. Add curry powder, salt and red pepper; stir-fry 10 seconds. Add chicken and stir-fry 3 minutes.

4. Stir in coconut milk, reduce heat to medium. Cook 2 minutes or until chicken is done. Stir in basil mixture and toss well.

5. To serve, spoon mixture over rice or noodles.

Source: Adapted from Cooking Light

  © Blogger template Brownium by Ourblogtemplates.com 2009

Back to TOP