Search This Blog

Monday, September 28, 2009

The Great Pumpkin Bread-Off!

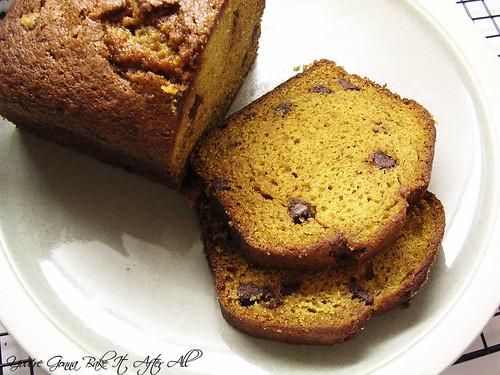
My friend Kathleen and I like everything pumpkin. Our favorite season is fall, and as soon as September rolls around, we break out our Sweet Cinnamon Pumpkin lotion and look forward to the pumpkin-filled treats to come. We both love this chocolate chip pumpkin bread we found years ago at Breadsmith, but this year I found out that the location near us had closed. I had one recipe for pumpkin bread that I've made a few times, and another one saved to make, so we decided to have a Bread-Off (rather than a Bake-Off) with the two recipes. We held the contest on our way to the apple orchard - which has the best cinnamon apple donuts ever by the way! It was a sugary day to say the least...

I'm mixed on my feelings about having chocolate chips in pumpkin bread - on one hand the combination of chocolate and pumpkin is a great; on the other, I think the chocolate distracts from the purity of the pumpkin. In the end, I decided to include chocolate chips in both breads, so the experiment was controlled. I should also mention that only I knew which bread was which and what components went into the breads; my two tasters (Kathleen and Bob) knew nothing going into it :)

Each original recipe makes 2 large loaves, so I just cut the recipes in half and made 1 loaf of each. The first time I made pumpkin bread, I used applesauce instead of the oil - to be honest, it wasn't nearly as good. I'd rather use the oil and just eat less!

I cannot even tell you how hard it was for me to find the pumpkin puree!!! So hard that this bread-off almost didn't happen. I went to two of the big chain grocery stores with no luck, and finally found some organic pumpkin puree at Whole Foods (for $3 a can - what the?!) Dominick's had canned pumpkin pie mix, but no thank you - I prefer to spice my pumpkin myself!

One of the recipes recommends making the bread a day ahead for best flavor. I've tried this before and happen to agree, so that's what I did with both loaves. As I was making the breads, I realized that these recipes are veeerrrry similar, and that made the tasting a little difficult. However, I think we were able to declare a winner. See below for the results!

Downeast Maine Pumpkin Bread (Bread A)

Recipe for 1 loaf.

Ingredients:
1/2 a 15-ounce can pumpkin puree
2 eggs
1/2 cup vegetable oil
1/3 cup water
1 1/2 cups white sugar
1 3/4 cups all-purpose flour
1 teaspoon baking soda
3/4 teaspoon salt
1/2 teaspoon ground cinnamon
1/2 teaspoon ground nutmeg
1/4 teaspoon ground cloves
1/8 teaspoon ground ginger
1/2 cup semi-sweet chocolate chips, optional

Directions:
1. Preheat oven to 350F. Grease and flour one 9 x 5-inch loaf pan.

2. In a large bowl, mix together pumpkin puree, eggs, oil, water, and sugar until well blended.

3. In a separate bowl, whisk together the flour, baking soda, salt, and spices, and then stir in the chocolate chips if using.

4. Stir the dry ingredients into the pumpkin mixture until just blended. Pour into the prepared pan.

5. Bake for about 50 minutes. Loaf is done when toothpick inserted in center comes out clean.

Source: Adapted from Allrecipes.com

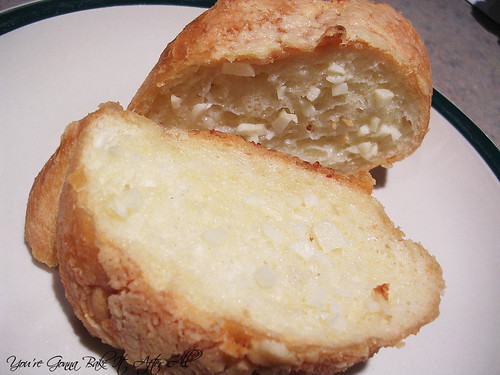
RESULT: Both tasters liked this bread. They both noted that it has good spice and was very moist.


Pumpkin Pie Bread (Bread B)
Recipe for 1 loaf.

Ingredients:
1 3/4 cups all-purpose flour
1 teaspoon baking soda
1/2 teaspoon baking powder
1 1/2 teaspoons pumpkin pie spice
1/2 teaspoon salt
1 1/2 cups white sugar
1/2 cup vegetable oil
2 eggs
1/2 a 15-ounce can pumpkin puree
1/4 cup water
1/2 cup semi-sweet chocolate chips, optional

Directions:
1. Preheat oven to 350F. Grease and flour one 9 x 5-inch loaf pan.

2. Sift together the flour, baking soda, baking powder, salt, and pumpkin pie spice, then stir in chocolate chips, if using. Set aside.

3. In a large bowl, beat together sugar, oil, eggs, and pumpkin. Stir in flour mixture alternately with water. Add batter to prepared pan.

4. Bake in oven for 50-60 minutes, or until toothpick inserted into center comes out clean. For best flavor, store wrapped in plastic wrap at room temperature for a full day before serving.

Source: Adapted from Allrecipes.com

RESULT: Both tasters again agreed that this is a moist bread. Kathleen thought it had more of a "pumpkin" taste, perhaps because it didn't have the same 'spiciness' as the other bread.


OVERALL RESULTS: Although these breads are almost too similar to compare, the winner is Bread A - the Downeast Pumpkin Bread. Overall, the tasters felt it had more of the "spice" one looks for in a pumpkin bread. I think that's because this bread has the spices added individually, rather than the premade pumpkin pie spice blend. Maybe that's why it has 5/5 stars from over 2,721 reviewers on Allrecipes!!!

Tuesday, September 22, 2009

Garlic Bread

First of all, thank you so much for all of your congratulations on the previous post! It seems surreal still, and I'm slowly starting to relax; helped along by a weekend of fun with friends, a trip to Top Chef Masters champ Rick Bayless's new Mexican street food joint XOCO (Rick himself was there!), and apple picking! :)

Now to the recipe. My mom's Garlic Bread is truly a recipe for all seasons. Over Labor Day weekend, she made it with barbecued chicken (my dad's handiwork), oven-roasted Parmesan potatoes, and a salad - seriously the BEST meal I've had in a long time. When the weather is cool, nothing goes better with lasagne or a big plate of spaghetti and (turkey) meatballs than this bread, in my opinion. My mom created this recipe a long time ago, probably before I was born, and I've eaten it ever since I could eat! My dentist (who was also a family friend) always jokes that when he and his wife came over for dinner, he was shocked to see a 2-year old (me) gobble down this garlic bread. As a young child, apparently I said "the crust is good but the filling is best." My mom and aunt still repeat this to me each time we have it. Not to disagree with the me of the past, but I now like the "filling" and crust equally because both are amazing!

This recipe may seem very simple, but my mom says the key is to cook it long enough and at a high heat - that way the crust gets nice and crisp. Although I LOVE this bread, it is definitely reserved for special occasions because of the amount of butter it requires! It does sound like a lot of butter, but I'm sure it's no more than a good Paula or Ina recipe :)

Garlic Bread

Ingredients:
1 loaf of French or Italian bread (about the size of a baguette)
1 stick of butter, softened
2-3 cloves of garlic, chopped
1/8 teaspoon garlic salt
Parmesan cheese, grated

Directions:
Preheat oven to 400F.
1. Mix butter, garlic, and garlic salt together.

2. Slice bread completely through into ~2-inch thick slices (see picture). Spread one side of each slice with about 2 teaspoons of butter mixture. Reassemble the bread on a long sheet of aluminum foil.

3. Spread a very thin layer of butter on top of the loaf. Note: You may have leftover butter mixture. You may use the rest or save it for another recipe. The extra butter on top will just melt and run down to make an extra buttery bottom crust - yum!

4. Sprinkle with lots of Parmesan cheese. Fold foil over to seal tightly. Bake for 20 minutes to achieve a nice, crispy crust.

Source: My mom!

Friday, September 18, 2009

Triple T Deluxe Pizza

Happy Friday!!! I am super excited today because I passed my final thesis defense exam yesterday, so aside from turning in some paper work and uploading my 245 page thesis to the graduate school website, I have finally earned my PhD! It feels good to say that after 5 years of hard work :)

I know I've posted several pizza recipes, but I just had to share this pizza because it was SOOOO good. Bob and I were really surprised how much we liked it - just as good as pizza we could order or get at a restaurant! I've called this pizza "Triple T" because it's made with Turkey pepperoni, Turkey bacon, and Turkey sausage. To make it a deluxe pizza, I added some green pepper and onion, which really put it over the top. You could always throw on some mushrooms or olives, if that's your thing. We absolutely love this crust recipe. I haven't found a pizza sauce recipe I like yet, so I tried jarred Ragu Pizza sauce and was surprised by how good it is, especially since I'm not a big fan of their spaghetti sauce. In the past I have bought canned pizza sauce but am never happy with the taste. As far as the turkey products go, I am pretty particular with which brands I buy, simply based on trial and error taste-wise.

I recommend Hormel turkey pepperoni:

Louis Rich ground turkey sausage (in a tube like regular pork sausage):
and Oscar Mayer turkey bacon:
I have used Jennie-O ground turkey sausage before (both hot and sweet), and it's fine, but for pizza I really prefer the Louis Rich. I completely urge you to try Oscar Mayer turkey bacon if you 1) have never tried turkey bacon, or 2) have tried other brands and don't like them. I really thought turkey bacon was pretty gross before finding Oscar Mayer. By the way, I am not a spokesperson for any of these brands, haha :)

Growing up, Friday nights were always pizza night. Anyone else have a Friday night dinner tradition???
Meghan's Triple T Deluxe Pizza

Ingredients:
1/2 batch pizza dough (enough for a large pizza)
~8 ounces of your favorite homemade or store-bought pizza sauce (Recommended: Ragu)
1/3 package ground turkey sausage, cooked and crumbled (~4 ounces - Recommended: Louis Rich)
Turkey pepperoni (Recommended: Hormel)
4 strips of turkey bacon, cooked but not too crisp, torn into small pieces (Recommended: Oscar Mayer)
2 teaspoons olive oil
1/2 green pepper, finely diced
1/2 yellow onion, finely diced (sweet or regular)
Mozzarella cheese, shredded
Parmesan cheese, grated
Pizza/Italian seasoning, to taste
Cornmeal, ~1/4 to 1/2 cup

Directions:
1. Heat olive oil in a saucepan over medium/high heat. Add the green pepper and saute for 3 minutes, then and half of the onion (equivalent of 1/4 onion) and saute until softened, about 3-5 minutes.

2. Preheat oven (with pizza stone inside) to 500F for at least 30 minutes.

3. Generously apply cornmeal to a large surface (like a cutting board) and roll out dough into a large circle (~14 inches in diameter). Remember that using ample cornmeal is essential to eventually sliding the pizza onto the pizza stone.

4. Top pizza as desired; I did the following, in this order: pepperoni, bacon, sausage, the grilled onions and peppers, the raw onions, the mozzarella cheese, grated Parmesan cheese, then a sprinkle of Pizza/Italian seasoning.

5. Remove hot pizza stone from oven, apply extra cornmeal if needed, and slip pizza onto stone. Bake for 8-12 minutes, or until cheese is melted as desired.

6. Remove pizza from oven, slide onto a large cutting board and slice. Enjoy!

Monday, September 14, 2009

Caramelized Apple Stuffed Chicken with Fontina and Cherries

One of Bob's favorite things is to pair sweet and savory. He especially loves fruit with meat, so when I saw this recipe on FoodNetwork.com, I knew he would love it. Guess what - I was right! :) I've had this recipe saved on my computer for a long time (we're talking 2007 here people!), but finally got around to making it a few months ago, and I'm just getting around to posting it now! We both thought this dish was great. The flavors all work really well together. Plus, we learned a new technique for stuffing chicken which Bob used to make a really great dinner a few weeks later. I just realized that I post a lot of "stuffed" recipes on this blog . . . hmmm
Caramelized Apple Stuffed Chicken with Fontina and Cherries

Ingredients:
For the marinade:
1/2 Tablespoon red wine vinegar
1 1/2 Tablespoons apple cider vinegar
1/2 teaspoon Dijon mustard
1/4 teaspoon dry mustard
1 teaspoon honey
3 1/2 Tablespoons olive oil

2 large chicken breasts
Salt and freshly ground black pepper
1/2 Tablespoon unsalted butter
1 medium Fuji apple
1 1/2 ounces fontina cheese, shredded
1 1/2 ounces dried cherries, roughly chopped

Directions:
1. Make the marinade: Place the red wine vinegar, apple cider vinegar, the mustards, and honey in a food processor. Turn on and drizzle in the olive oil until fully incorporated (emulsified).

2. Marinate the chicken breasts overnight in this mixture (I did 30 minutes after reading an article in Cook's Illustrated that 30 minutes is all that's needed for marinating chicken).

3. Make the stuffing: Peel, core, and very roughly chop the apple. Melt the butter in a saute pan over medium/high heat and add the apples. Cook for roughly 5 to 10 minutes or until deeply browned. Remove from heat and transfer to a mixing bowl. Once cooled, add the fontina and cherries and mix. Season to taste with salt and pepper.

4. Preheat grill or grill pan on high. Remove chicken breasts from the marinade and transfer to a plate. Season with salt and pepper. Mark the chicken breasts by grilling them only long enough to make grill marks, then rotate them about 45 degrees to make crosshatch marks. Do this on 1 side only. The chicken breasts will still be completely raw inside.

5. Preheat the oven to 400F. Cut a slit in the side of each breast (in the thicker part) about 1-inch wide, creating a pocket almost as large as the breast itself. Stuff the breasts with the apple stuffing mix - cramming in as much as possible without ripping the breast. At this point the breasts are ready to be baked or can be held in the refrigerator for up to 24 hours

6. Place chicken on a baking sheet and bake for about 12-15 minutes or until an instant-read thermometer registers 155F in the thickest part of the breast. (Mine took quite a bit longer to cook - perhaps 30-40 minutes. I don't have an instant-read thermometer so I had to cut and check for pink.)

Source: Adapted from FoodNetwork.com

Friday, September 11, 2009

Bourbon Chicken

I won these adorable bowls, place mats, and chop sticks from a giveaway on Jenny's blog Picky Palate! This is my first time winning a giveaway so I was so excited. These are so adorable, that I just had to make a dinner to go with them. I've made this recipe for Bourbon Chicken before a few times, and we really like it! It has a wonderful flavor, and it's not even fried like a lot of similar recipes. There's no bourbon in it - I think it's named after a dish the "Bourbon chicken" at food court Chinese restaurants, which I'm quite certain does not contain bourbon either! I served this over brown rice, but it would be fantastic with jasmine rice or any other kind you prefer. The original recipe serves 4. I cut down the amount to serve 2 but keep the amount of sauce the same - we really like sauce! If you don't require much sauce, you may want to scale back (or scale up the chicken). I add a slurry of cornstarch and water to thicken the sauce up a bit, since we prefer it that way.

A little fun fact - I actually included one of these pictures in my new blog header that I put up a while back, figuring no one would notice that I hadn't actually posted the recipe yet! Very sneaky of me, huh? :)

Bourbon Chicken

Ingredients:
2 pounds boneless, skinless chicken breasts, cut into bite-size pieces (I cut down this amount and used 1 large chicken breast)
1-2 Tablespoons olive oil
1 garlic clove, crushed
1/4 teaspoon dried ground ginger
3/4 teaspoon crushed red pepper flakes
1/4 cup apple juice
1/3 cup light brown sugar
2 Tablespoons ketchup
1 Tablespoon cider vinegar
1/3 cup soy sauce (I use reduced sodium)

1 Tablespooon cornstarch/1 Tablespoon water slurry, optional

Directions:
1. Heat oil in a large skillet. Add chicken and cook until lightly browned.

2. Remove chicken from skillet. Add remaining ingredients, heating over medium heat until well mixed and dissolved.

3. Add chicken and bring to a hard boil.

4. Reduce heat and simmer for 20 minutes, or until chicken is cooked through. If you prefer a thicker sauce, add a slurry of cornstarch and water (premixed in a separate bowl) to reach desired consistency.

5. Serve over hot rice, if desired.

Source: Adapted from RecipeZaar.com

Wednesday, September 9, 2009

Pepper Jack Stuffed Turkey Burgers

Happy 09.09.09! I think it's a pretty cool day!

I made these turkey burgers several weeks ago, and we really liked them. I only had a 1 pound package of ground turkey, so I scaled the recipe back, expect for the soup mix - I used the entire packet. Needless to say, they were a bit salty. I suggest using only 2/3 of the packet if you have just 1 lb of ground turkey. These burgers were really flavorful and juicy. It was a little harder to tell when they were done because they were so moist!

The original recipe for these burgers does not include BBQ sauce or pepper jack cheese - I just jazzed them up a bit. Like I've said before, we typically have burgers without buns, which is what we did this time, but you can certainly serve them with buns and all the typical toppings.
Pepper Jack Stuffed Turkey Burgers

Ingredients:
1 1/2 pounds ground turkey
1 packet (1 ounce) dry French onion soup mix
1 1/2 Tablespoons soy sauce
1/2 teaspoon garlic powder
1/2 teaspoon ground black pepper
1 egg, lightly beaten, optional
barbecue sauce, optional
3 slices pepper jack cheese

Directions:
1. In a large bowl, mix the soup mix, soy sauce, garlic powder, black pepper, and egg. Add turkey and mix until just incorporated. Refrigerate for at least 10 minutes. Cut each slice of cheese in half, then fold each of those pieces in half. Form the meat into 6 patties, while inserting the cheese in the center, making sure it's covered on all sides.

2. Preheat a grill pan lightly coated in olive oil (or a grill). Place patties on the grill. Cook until no longer pink inside. Add barbecue sauce while grilling if desired.

Source: Adapted from Allrecipes.com

Friday, September 4, 2009

Creamy Chicken with Bowtie Pasta

This recipe was originally served inside an adorable puff pastry shell, but Leslie suggested that it would great over pasta as well. I love bowtie pasta, so I decided to make the chicken and sauce with that. This recipe is so delicious!!! I love all of the flavors. I highly recommend this recipe!

Creamy Chicken w/ Bowtie Pasta

Ingredients:
2 chicken breasts, diced
olive oil
salt and pepper to taste
4 ounces light cream cheese, softened
4 basil leaves, finely chopped
2 Tablespoons sundried tomatoes
1 clove garlic, chopped
3 slices turkey bacon, cooked crispy and broken (Recommended: Oscar Mayer brand)
1 1/2 Tablespoons grated or shredded Parmesan cheese
1/3 cup white wine, or a little more
Milk or cream, optional
Parmesan cheese, optional

~ 6 ounces pasta, prepared according to package directions

Directions:
1. Heat a pot of water to boiling for the pasta, and cook pasta according to package directions.

2. Meanwhile, heat oil in a skillet over medium heat. Add the chicken and season with salt and pepper. Cook until no longer pink, about 5-8 minutes.

3. In a medium bowl, mix together the cream cheese, basil, sundried tomatoes, garlic, bacon, cream cheese, and wine. Mix until smooth.

4. Slowly add the mixture to the chicken and mix until no lumps remain.

5. Add extra wine or milk/cream to achieve desired consistency.

6. Serve over pasta, or add pasta to pan, mix, and then serve. Top with Parmesan cheese, if desired.

Source: Adapted from The Hungry Housewife

Wednesday, September 2, 2009

Soft Garlic Knots

Since it's summer, I've been hearing about gazpacho everywhere. I kept wondering why people get excited about this cold soup, but then my mom said she had some in a restaurant and it was fantastic. So, several weeks ago, I figured I might as well try it while the weather was still hot. Bob was really dreading this dinner, so I decided to make these warm Soft Garlic Knots to go with it to make the meal a little more bearable for him. Well, it turns out that neither of us like gazpacho! We felt like it was eating salsa without the chips. I'm not going to bother posting the recipe, since I just used this one from Barefoot Contessa, but I feel like we are the only two people in the world who don't care for gazpacho! Oh well!

Considering the main dinner was a flop, we basically ate these rolls for dinner, and they were really good. Unfortunately, Bob ate 3 and then felt so full later, claiming they were expanding inside him. I don't know if he'll eat them again because of that, but had he just eaten 1 (or even 2), I think it would have been fine!

The recipe I adapted this from calls for a stand mixer (so if you have one you can see that recipe for instructions). I don't have one, so I used a food processor and then kneaded by hand. This is only my second time kneading dough by hand, and it was ok, but I am really looking forward to having that mixer with a dough hook some day! :)
Soft Garlic Knots

Ingredients:
For the dough:
3 cups bread flour
1 Tablespoon sugar
2 teaspoons instant yeast (AKA rapid rise)
1 1/4 teaspoon salt
2 Tablespoons olive oil
1/4 cup milk
1 cup + 2 Tablespoons lukewarm water

For the glaze:
2 cloves garlic
2 Tablespoons melted butter
1/2 teaspoon Italian seasoning

Directions:
1. Make the dough: Combine the dry ingredients in the bowl of a large food processor. Process for a few seconds to mix. Add the olive oil, milk and water and turn on until ingredients have formed a ball (it won't take long, maybe 30 seconds).

2. Knead the dough on a lightly floured surface to form a smooth, elastic dough, adding additional water or flour as needed.

3. Place the dough in a lightly greased bowl, turn to coat, and cover with lightly oiled/sprayed plastic wrap. Allow to rise for about 1 hour, until it has doubled in bulk.

4. Divide the dough into 10 equal pieces. Roll each into a 10-inch long rope and tie into a knot. Take the end lying underneath the knot and bring it over the top, tucking it into the center. Take the end lying over the knot and tuck it underneath and into the center.

5. Transfer the shaped rolls to a baking stone or a parchment paper-lined baking sheet. Cover with a clean kitchen towel and let rise for 45 minutes, until puffy. Meanwhile, preheat the oven to 350F.

6. Make the glaze: Finely mince the garlic (or use a garlic press). Mix the melted butter and Italian seasoning.

7. Brush the glaze onto the shaped rolls. Bake until set and lightly browned, about 15-18 minutes.

Source: Adapted from Annie's Eats

  © Blogger template Brownium by Ourblogtemplates.com 2009

Back to TOP